
Today, I want to share with you the process by which I make Pollack Eggs. There are very simply to do and is a great alternative to dyeing Easter Eggs. I wouldn't eat these eggs since you are using acrylic paints.
Supplies:
Blown Out Eggs
Skewers/dowels
Poster Putty
Acrylic Paints (use the cheap ones--I used Liquixtex Basics)
Cling Film (I used Saran Wrap)
Storage Container for drying
Styrofoam Plate (I know these aren't environmentally friendly but they work the best for mixing paints)
Step One: Preparing Supplies
Place your poster putty on a skewer about half way down and place egg on skewer
Prepare your palette of paint. I usually use four colors (dark, medium/bright, and white). Squirt a dollop of each color on your plate. Be sure they are close enough to each other so they can mix.
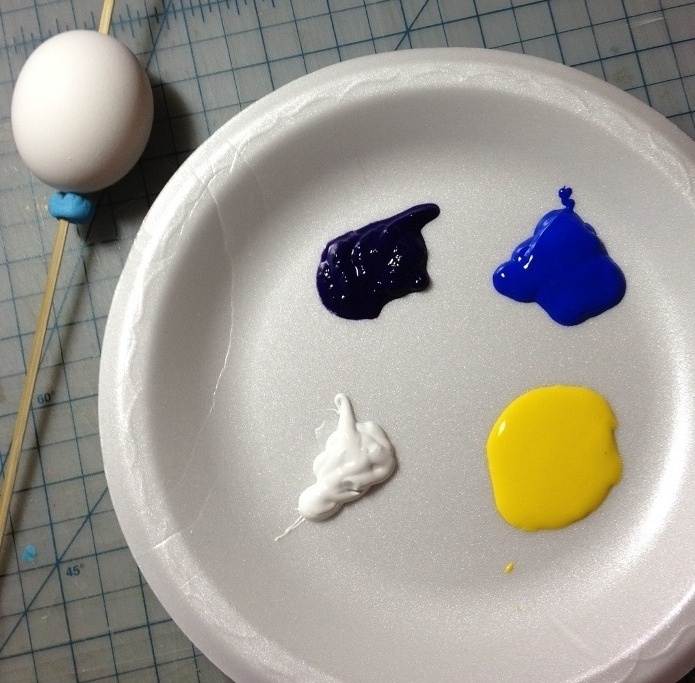 |
| Step One--I forgot to take a picture of the palette illustrated below |
Take a piece of cling film and ball it up so that paint can stick to a surface. Dab the ball in the darkest color and dab onto the egg. Use an up and down motion (similar to stenciling). You want to lift straight up so you don't smear the paint. Cover most of the egg with this color but try and let some of the white show through.
 |
| First Color: Purple |
Find a clean portion of the film and ball it up. Dab the ball into one of the medium colors. Cover most of the egg with this color.
 |
| Second Color: Orange |
Remove the egg from the skewer and replace the egg so that the bottom is the new top. You will probably have a white spot where originally the egg rested against the putty. Turn the cling film inside out so that the first two colors are inside the ball. Dab the ball into the second of the medium colors. Use this color as a highlight. At this point you can reintroduce any of the previous colors if they seem to be hidden/missing.
 |
| Third Color: Yellow |
Find a clean spot on the cling film and make a ball. Dab the ball into the white paint and lightly add highlights along the egg to brighten up the egg or to show a resemblance of the white egg.
 |
| Final Color: White |
 |
| The Final Egg |
Place the skewer and egg in a place to dry in the open air. This shouldn't take long since you didn't use a lot of paint. Place the skewer across the storage container to allow to dry.
 |
| Pretty Eggs Drying |
 |
| Blue, Kelly Green, Emerald Green and White |
 |
| Red, Orange, Pink and White |
 |
| Blue, Green, Yellow and White |
This is a really fast project and you can paint a lot of eggs very quickly. All for of these eggs took less than 20 minutes to do and most of that time was finding the paints and setting up the palette. The paint palettes stay fresh for a long time and this is an easy (but messy) way for kids to get involved with painting eggs--especially since there is no wrong way to do this. If you need to step away from your paint palette, take a slightly damp paper towel and rest it over the plate until you return.
Tomorrow, I will be sharing with you some last minute egg decorating you can do if you procrastinated and waited to decorate this year.
No comments:
Post a Comment